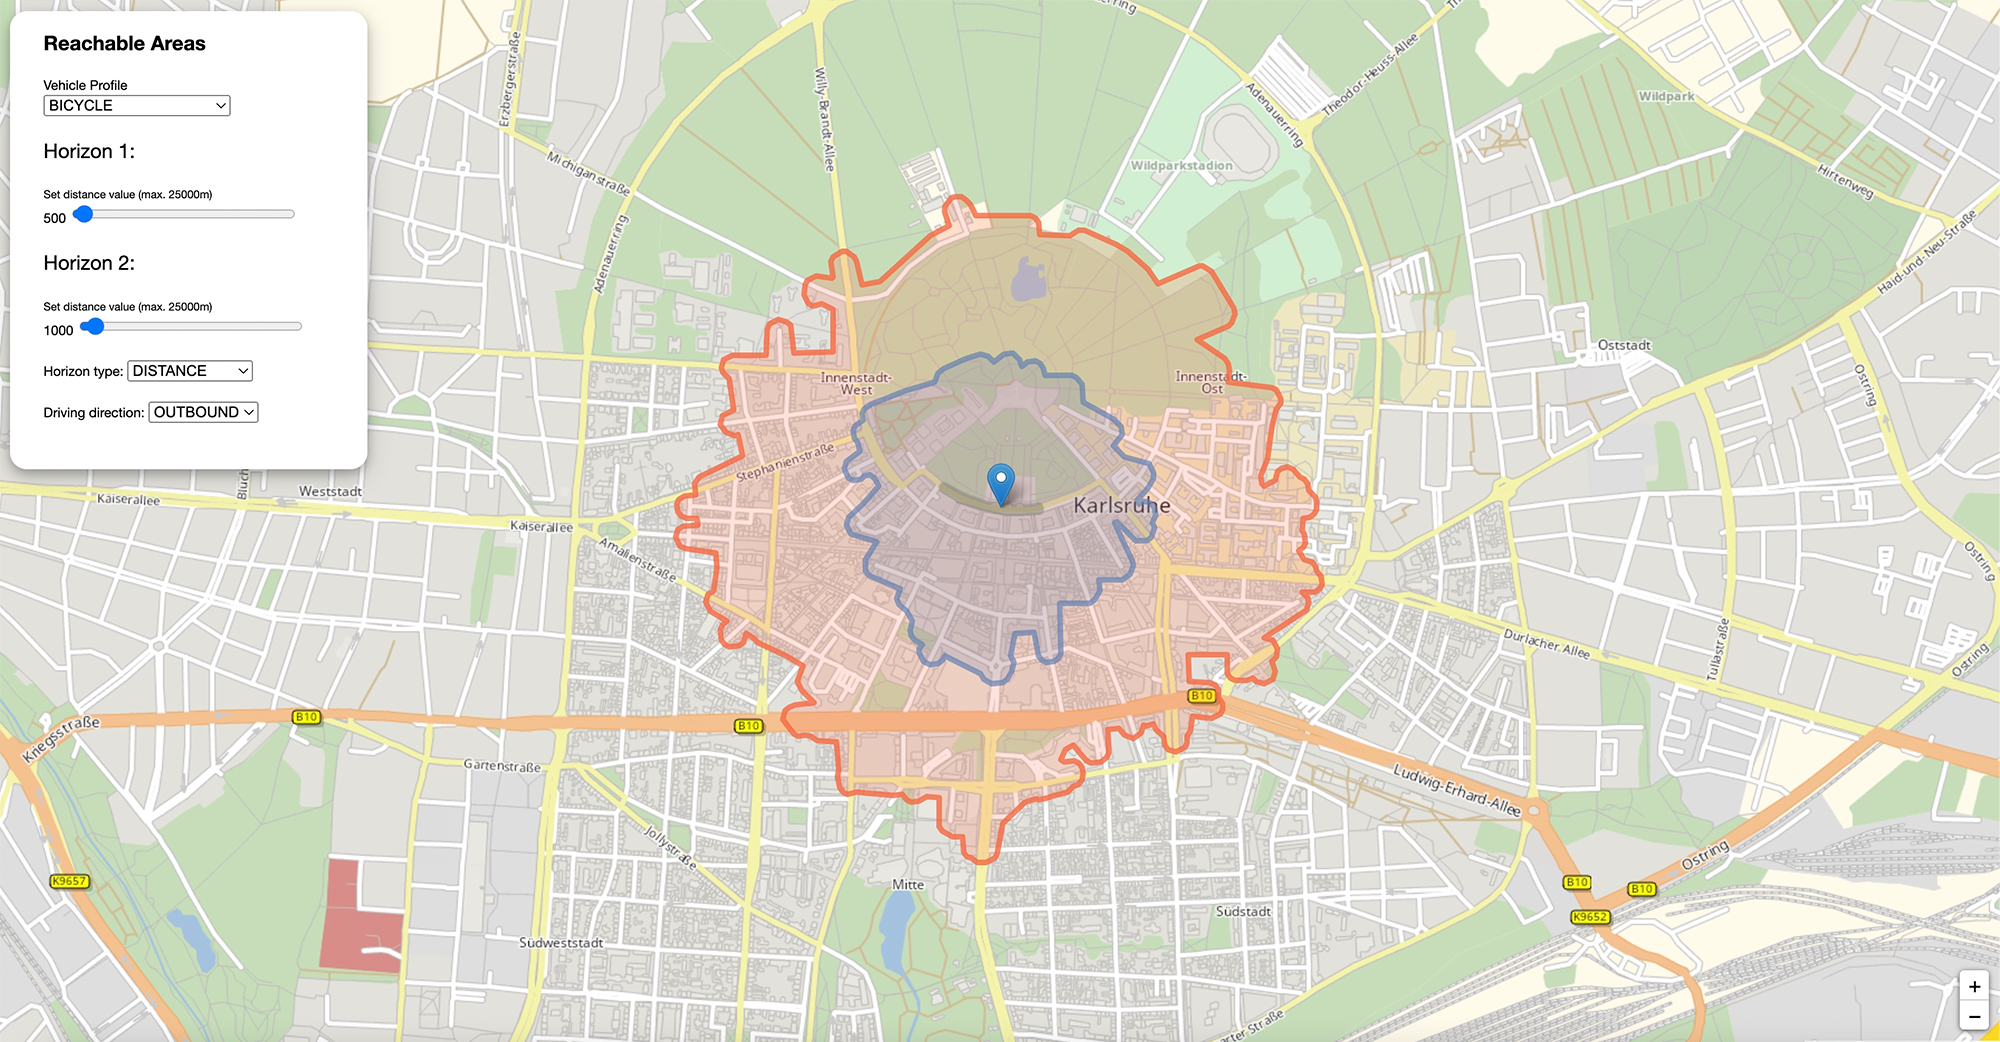
In this tutorial you will learn how a Reachable Areas Routing App is implemented that uses the calculation of reachable areas from one specific position. It will allow to display a map, click on a location anywhere on the map and calculate areas around this location that are reachable in a specific distance or time. To concentrate on the basic principles, all other important features like error treatment or type ahead address search are neglected. The aim of the code examples is to illustrate the use of the PTV Developer Routing API.
Prerequisites
- Basic JavaScript knowledge.
- Basic knowledge of JavaScript asynchronous programming using Promises.
- Helpful: Basic knowledge of jQuery. A page like the W3 Schools jQuery tutorial is sufficient.
How to use this tutorial
The tutorial will start similar to a cooking recipe. After the basic steps how to create the app are explained, the tutorial will focus on the major building blocks.
Getting started
- Request an API key:
- Register and login at myptv.com
- Activate PTV Developer
- Create your API key
- Download an editor like Visual Studio Code or Atom to work on HTML and JavaScript.
- Look up more details of requests and responses in the respective reference manual.
- Read the Leaflet reference documentation for further information.
Create an HTML page to display a map
Create a new HTML file called index.html and initialize a Leaflet map using the code below.
<html>
<head>
  <title>Reachable Areas</title>
  <link rel="stylesheet" href="https://unpkg.com/leaflet@1.6.0/dist/leaflet.css" />
  <link rel="stylesheet" type="text/css" href="./style.css">
  <script src="https://unpkg.com/leaflet@1.6.0/dist/leaflet.js"></script>
  <script src="https://ajax.googleapis.com/ajax/libs/jquery/3.6.0/jquery.min.js"></script>
  <script src="Reachable_Areas.js"></script>
</head>
<body>
  <div style="width:  100%" id="map"></div>
</body>
</html>
JavaScript code
Create a new JavaScript file called Reachable_Areas.js. Add the code below and replace the string "YOUR_API_KEY" with your PTV Developer API key. After loading the index.html file into a web browser, you should see a panable and zoomable map.
$(document).ready(function () {
  // Please enter your API key here
  const api_key = "YOUR_API_KEY";
  const tileURL = `https://api.myptv.com/rastermaps/v1/image-tiles/{z}/{x}/{y}?apiKey=${api_key}`;
  const routingURL = "https://api.myptv.com/routing/v1/reachable-areas";
  var routingURLObj = new URL(routingURL);
  var markers = [];
  var vehicleProfile =  "BICYCLE";
  var drivingDirection = "OUTBOUND";
  var horizon1 = 500;
  var horizon2 = 1000;
  var horizonLayer1 = null;
  var horizonLayer2 = null;
  var startPosition = L.latLng(49.01084899902344, 8.403818130493164);
  var map = new L.Map('map', {
    center: startPosition,
    zoom: 15,
    zoomControl: false
  });
  L.control.zoom({
    position: 'bottomright'
  }).addTo(map);
  var tileLayer = new L.tileLayer(tileURL, {
    attribution: "©2023, PTV Group, HERE",
    tileSize: 256,
    trackResize: false,
  }).addTo(map);
});
Explanation of the important code lines
This jQuery expression indicates that the code inside the curly brackets is executed only if the root index.html file is completely loaded.
$(document).ready(function() {
      ...
});
The first argument given to the L.Map constructor references the DOM element with the id map. The following lines show how a leaflet map control like zooming is created.
var map = new L.Map('map', {
    center: coordinates,
    zoom: 15,
    zoomControl: false
});
L.control.zoom({
    position: 'bottomright'
}).addTo(map);
The expressions {z}/{x}/{y} in the tileURL are placeholders which are replaced by default.
const tileURL = `https://api.myptv.com/rastermaps/v1/image-tiles/{z}/{x}/{y}?apiKey=${api_key}`;More information on this can be found in the Raster Maps API Documentation
All other replacements have to be defined in the constructor parameters of L.tileLayer.
var tileLayer = new L.tileLayer(tileURL, {
attribution: "©2023, PTV Group, HERE",
tileSize: 256,
trackResize: false,
                    }).addTo(map);
The rendered HTML page constitutes already an interactive zoom-able and pan-able map. The next section shows how to create input controls for all necessary parameters to calculate reachable areas around a position that can be picked by clicking anywhere in the map.
Setting initial start position
We've added the start position to our Reachable_Areas.js with the variable:
var startPosition = L.latLng(49.01084899902344, 8.403818130493164);
and now we add the initial marker on the map with the setMarker() function.
function setMarker() {
  var marker = L.marker(startPosition).addTo(map);
  markers.push(marker);
}
Adding click functionality to the map
In this step we are adding a function that helps to retrieve the coordinates of this point it the user clicks on the map. This click point is then set as the start position for the calculation of the reachable areas.
Therefore the function onMapClick() is added to the Reachable_Areas.js
function onMapClick(e) {
  removeAllMarkers(map);
  startPosition = e.latlng;
  L.marker(startPosition).addTo(map);
  fetchRoute();
}
The helper function removeAllMarkers() is used to remove all existing markers from the map if a click point has already been set in the map.
function removeAllMarkers(map) {
  map.eachLayer((layer) => {
    if (layer instanceof L.Marker) {
      layer.remove();
    }
  });
}
Adding map controls
The next step is the function addMapControls() which adds some controls to the map so that the user can change parameters for the calculation.
function addMapControls() {
  const routingControl = L.control({ position: 'topleft' });
  ...
  routingControl.addTo(map);
};
Explanation of addMapControls() function
Within the addMapControls() function some html-elements are added for selecting the vehicle profile, changing the value of the horizon, switching between horizon types DISTANCE and TIME and selecting different calculation methods INBOUND or OUTBOUND.
At the end of this function an eventListener() is added to every html-element to react on changes and recalculate the reachable areas with the new settings by calling the fetchRoute() function.
There is one special function checkHorizonType() which is described in an extra chapter below.
function addMapControls() {
  routingControl.onAdd = function (map) {
  const div = L.DomUtil.create('div', 'routing-control');
  const html = '
    <h2>Reachable Areas</h2>
    <div>
      <label for="vehicleProfile" style="display: block;">Vehicle Profile</label>
      <select name="vehicleProfile" id="vehicleProfile" style="display: block;">
        <option value="BICYCLE">BICYCLE</option>
        <option value="EUR_TRAILER_TRUCK">EUR_TRAILER_TRUCK</option>
        <option value="EUR_TRUCK_40T">EUR_TRUCK_40T</option>
        <option value="EUR_TRUCK_11_99T">EUR_TRUCK_11_99T</option>
        <option value="EUR_TRUCK_7_49T">EUR_TRUCK_7_49T</option>
        <option value="EUR_VAN">EUR_VAN</option>
        <option value="EUR_CAR">EUR_CAR</option>
      </select>
    </div>
    <div id="slider">
      <p>Horizon 1:</p>
      <div id="title_horizon1" style="font-size:x-small"> Set distance value (max. 25000m)</div>
      <label for="horizon1" id="horizon1_label">500m</label>
      <input class="hor1" type="range" style="width: 200px;" name="horizon1" id="horizon1" value="500" min="100" max="25000" " />
      <p>Horizon 2:</p>
      <div id="title_horizon2" style="font-size:x-small">Set distance value (max. 25000m)</div>
      <label for="horizon2" id="horizon2_label">1000m</label>
      <input class="hor2" type="range" style="width: 200px;"  name="horizon2" id="horizon2" value="1000" min="100" max="25000" " />
    </div>
    <br/>
    <div>
      <div>
        <label for="horizonType" style="display: nowrap;">Horizon type:</label>
        <select name="horizonType" id="horizonType" style="display: nowrap;">
          <option value="DISTANCE">DISTANCE</option>
          <option value="TRAVEL_TIME">TRAVEL_TIME</option>
        </select>
      </div>
      <br/>
      <div>
        <label for="drivingDirection" style="display: nowwrap;">Driving direction:</label>
        <select name="drivingDirection" id="drivingDirection" style="display: nowrap;">
          <option value="OUTBOUND">OUTBOUND</option>
          <option value="INBOUND">INBOUND</option>
        </select>
      </div>
    </div>
  `;
  div.innerHTML = html;
  L.DomEvent.disableScrollPropagation(div);
  L.DomEvent.disableClickPropagation(div);
  return div;
};
routingControl.addTo(map);
document.getElementById("vehicleProfile").addEventListener("change", fetchRoute);
document.getElementById("horizon1").addEventListener("change", fetchRoute);
document.getElementById("horizon2").addEventListener("change", fetchRoute);
document.getElementById("horizonType").addEventListener("change", checkHorizonType);
document.getElementById("drivingDirection").addEventListener("change", fetchRoute);
Explanation of checkHorizonType() function
This function is needed to make sure that if the user switches the horizon type the different units for distance and time are represented correctly on the sliders and different default values are set. At the end of the function fetchRoute() is called to calculate the reachable areas.
Please be aware that if the user selects a value for horizon1 that is bigger than horizon2 an error is thrown as there is no error handling implemented.
function checkHorizonType(){
  if(document.getElementById("horizonType").value == "DISTANCE"){
    //set new slider values
    //limit 25000 m
    document.getElementById("horizon1").value = 500;
    document.getElementById("horizon1").min = 100;
    document.getElementById("horizon1").max = 25000;
    document.getElementById("horizon2").value = 1000;
    document.getElementById("horizon2").min = 100;
    document.getElementById("horizon2").max = 25000;

    document.getElementById("title_horizon1").innerHTML = "Horizon 1: Set distance value (max. 25000 m)";
    document.getElementById("title_horizon2").innerHTML = "Horizon 2: Set distance value (max. 25000 m))";
  } else {
    //set new slider values
    //limit 1200
    document.getElementById("horizon1").value = 60;
    document.getElementById("horizon1").min = 10;
    document.getElementById("horizon1").max = 1200;
    document.getElementById("horizon2").value = 800;
    document.getElementById("horizon2").min = 10;
    document.getElementById("horizon2").max = 1200;
    document.getElementById("title_horizon1").innerHTML = "Set time value (max. 1200 s)";
    document.getElementById("title_horizon2").innerHTML = "Set time value (max. 1200 s)";
  }

  fetchRoute();
}
Call the PTV Routing API
The PTV Routing API call is done in the same manner like the geocoding. In our basic scenario we send only coordinates of the start position together with the result option to acquire a polyline to the server. In this example, the parameter result is POLYLINE. The HTTP method is GET and the headers contains the API key and the needed content type.
With fetchRoute(), our first call to the PTV Routing API is made.
function fetchRoute() {
      // The definition of the REST parameters differs from geocoding because the waypoint parameter will occur multiple times.
      // See: https://developer.myptv.com/Documentation/Routing%20API/API%20Reference.htm
      fetch(
        "https://api.myptv.com/routing/v1/reachable-areas" + getReachableAreasQuery(), {
        method: "GET",
        headers: {
          "apiKey": api_key,
          "Content-Type": "application/json"
        }
      }).then(response => response.json()
        .then(result => {
          //Evaluate result and display polyogons
          displayPolygons(map, result);
      })).catch(ex => {
        alert(ex.message);
      });
}
Explanation of the important code lines
First of all, we need to build an URL with query parameters to send the required parameters to the server. Therefore a function getReachableAreasQuery() is used to collect all values for the necessary parameters from the html-elements we defined earlier.
function getReachableAreasQuery() {
  var reachableQuery = "?waypoint=" + startPosition.lat + "," + startPosition.lng;
  if (document.getElementById("vehicleProfile").value !== "") {
    vehicleProfile = document.getElementById("vehicleProfile").value;
    reachableQuery += '&'+"profile=" + vehicleProfile;
  }
  if (document.getElementById("horizon1").value !== "") {
    horizon1 = document.getElementById("horizon1").value;
    document.getElementById("horizon1_label").innerHTML = horizon1;
    reachableQuery += '&'+"horizons=" + document.getElementById("horizon1").value + "," + document.getElementById("horizon2").value;
  }
  if (document.getElementById("horizon2").value !== "") {
    horizon2 = document.getElementById("horizon2").value;
    document.getElementById("horizon2_label").innerHTML = horizon2;
  }
  if (document.getElementById("horizonType").value !== "") {
    reachableQuery += '&'+"horizonType=" + document.getElementById("horizonType").value;
  }
  if (document.getElementById("drivingDirection").value !== "") {
    reachableQuery += '&'+"options[drivingDirection]=" + document.getElementById("drivingDirection").value;
  }
  return reachableQuery;
}
After the fetch method is finished, the response will then be converted to JSON. In the next line, the polyline will be displayed on the map.
.then(response => response.json()
    .then(result => {
        document.getElementById("travelResult").innerHTML = convertTime(result.travelTime) + ' for ' + convertDistance(result.distance);
        displayPolyline(map, JSON.parse(result.polyline));
    }));
The function displayPolygons contains the style for the two polygons we receive from the response. We use the polygonin the geoJSON format as provided by the response of the routing API call.
function displayPolygons(map, poly) {
    poly1 = JSON.parse(poly.polygons[0]);
    poly2 = JSON.parse(poly.polygons[1]);
    if (horizonLayer1 !== null) {
      map.removeLayer(horizonLayer1);
      map.removeLayer(horizonLayer2);
    }
    var myStyle = {
      "color": '#2882C8',
      "weight": 5,
      "opacity": 0.65
    };
    var myStyle2 = {
      "color": '#f56942',
      "weight": 5,
      "opacity": 0.8
    };
    horizonLayer1 = L.geoJSON(poly1, {
      style: myStyle
    }).addTo(map);
    horizonLayer2 = L.geoJSON(poly2, {
      style: myStyle2
    }).addTo(map);
    map.fitBounds(horizonLayer2.getBounds());
  }
}
Now you have learned to calculate the reachable areas using the PTV Developer Routing API.