In this tutorial, you'll learn how to implement specific constraints when optimizing routes with PTV Route Optimization OptiFlow API.
We'll discover how to constrain a sequence of orders, associate vehicles with orders and complete existing routes without modifying the established sequences.
The objective of the code examples is to illustrate the use of the PTV Route Optimization OptiFlow API.
Prerequisites
- JavaScript knowledge, including up-to-date knowledge of ES6 features.
- Basic knowledge of JavaScript asynchronous programming using Promises.
- HTML page for displaying PTV Raster Map with Leaflet. For help, please visit this tutorial on Raster Maps.
- CSS layout using Flexbox.
- A JavaScript library for date and time manipulation, such as Day.js or Moment.js.
Getting started
- Request an API key:
- Register and login at myptv.com
- Activate PTV Developer
- Create your API key
- Download an editor such as Visual Studio Code or Atom which work with HTML and JavaScript.
- You can find more details of requests and responses in the reference manual.
- Detailed information about the PTV Developer Route Optimization OptiFlow API is also available in the Quick Start.
- For more information, please visit the Leaflet reference documentation.
Basic structure and map integration

Setting up the HTML structure
In this first step, we'll create the HTML structure of our application. Our page will be divided into three main parts: a header, a side panel for configurations and order lists, and a map which will take up most of the screen.
The HTML structure uses classes to create a flexible layout with CSS.
  <body>
    <header class="grow-0">
      <h2>Fixations of orders/trips</h2>
    </header>
    <main class="grow-1 container container-row">
      <aside class="grow-0 panel container container-column">
        <section class="grow-0">
          <h3>Configuration</h3>
          <div class="border">
            Add configuration form here
          </div>
        </section>
        <section class="grow-1 container container-column">
          <div class="grow-0">
            <h3>Orders</h3>
          </div>
          <div class="grow-1 scrollable border">
            <div class="long">
              Orders list here
            </div>
          </div>
        </section>
        <section class="grow-0">
          <button id="start-optimization">Start Optimization</button>
        </section>
      </aside>
      <section class="grow-1" id="map"></section>
    </main>
  </body>
Basic CSS styles
Our CSS file defines the application's layout, using Flexbox to create a well-organized, responsive interface.
Use of flex-grow to control space distribution container-row and container-column classes to define container orientation and scrollable class for scrolling zones
.container {
  display: flex;
  align-items: stretch;
  height: 100%
}
.container-row {
  flex-direction: row;
}
.container-column {
  flex-direction: column;
}
.grow-0 {
  flex-grow: 0;
}
.grow-1 {
  flex-grow: 1;
}
.scrollable {
  overflow-y: auto;
  flex: 1 1 0;
}
.space-between {
  justify-content: space-between;
}
Leaflet map initialization
In our JavaScript file, we initialize the Leaflet map and configure the PTV map tiles.
/**
 * The map
 * @type {LeafletMap}
 */
let map;

/**
 * The API key
 * @type {string}
 */
const api_key = "YOUR_API_KEY";

/**
 * Initialize the map
 */
function initMap() {
  const coordinate = L.latLng(49, 8.4);
  map = new L.Map('map', {
    center: coordinate,
    zoom: 13,
    zoomControl: false
  });
  L.control.zoom({ position: 'bottomright' }).addTo(map);
  new L.tileLayer(
    "https://api.myptv.com/rastermaps/v1/image-tiles/{z}/{x}/{y}?size={tileSize}",
    {
      attribution: "© " + new Date().getFullYear() + ", PTV Logistics, HERE",
      tileSize: 256,
      trackResize: false,
    },
    [
      { header: "apiKey", value: api_key },
    ]
  ).addTo(map);
  map.on('click', handleMapClick);
}

/**
 * Wait for the document to be ready
 */
$(document).ready(() => {
  initMap();
});
Preparing the map click function
For the moment, our handleMapClick function is empty, but it will be implemented in the next step to add commands when the user clicks on the map.
/**
 * Handle the click event on the map
 * @param {LeafletMouseEvent} e - The event
 */
function handleMapClick(e) {
  // @todo Implement this function
}
This function will receive a Leaflet click event containing the geographic coordinates of the clicked point. In the next step, we'll use these coordinates to create a new order and add it to our list.
Order and depot management
Order storage
In this step, we'll create a data structure to store the orders. Each order will have an index, geographic coordinates, address and color.
/**
 * The orders
 * @type {Array}
 */
const orders = [];
This simple declaration allows us to create an array containing all our commands. Each order will be an object with several properties that we'll define when we add an order.
Configuration form
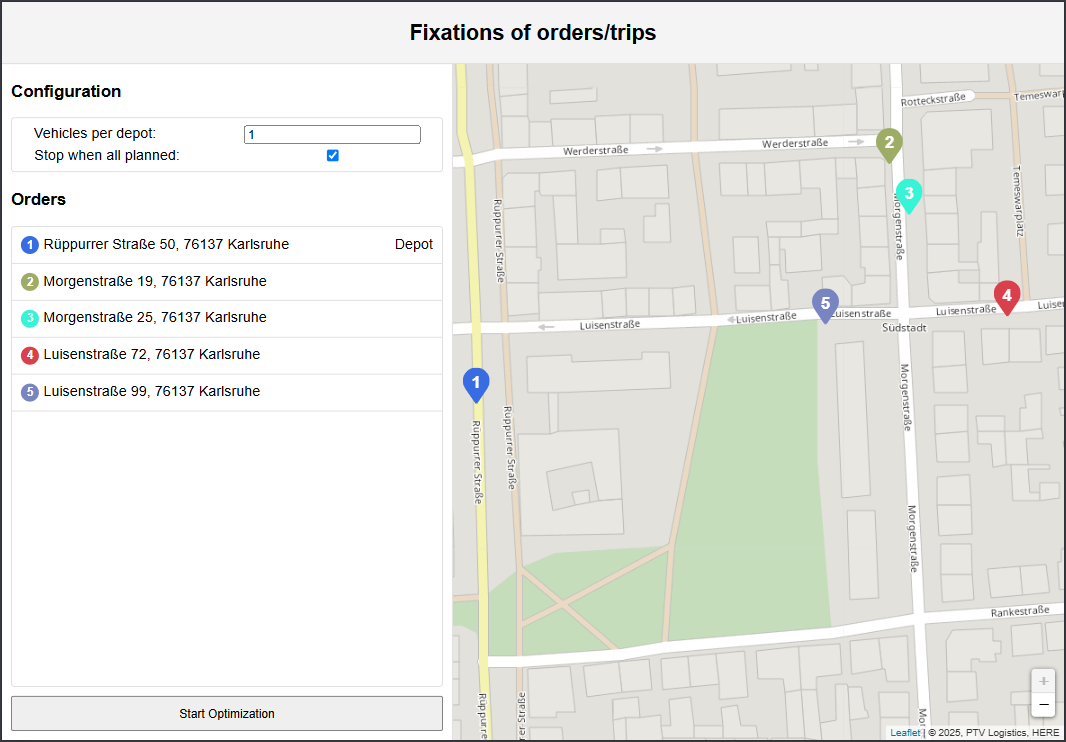
We're now going to replace the "Add configuration form here" text with a real form for configuring vehicle and control parameters.
<div class="border" id="configuration">
  <label>
    <span>Vehicles per depot:</span>
    <input type="number" id="vehicle-count" min="1" value="1">
  </label>
  <label>
    <span>Stop when all planned:</span>
    <input type="checkbox" id="optimization-stop" checked>
  </label>
</div>
And we add functions to retrieve these values:
/**
 * Get the vehicle count per depot
 * @returns {number} - The vehicle count count per depot
 */
function getVehicleCount() {
  return parseInt($('#vehicle-count').val());
}

/**
 * Get the optimization stop
 * @returns {boolean} - The optimization stop
 */
function getOptimizationStop() {
  return $('#optimization-stop').is(':checked');
}
Interaction with the map
Now we'll implement the handleMapClick function to add a command when the user clicks on the map.
We'll also use PTV Developer Geocoding & Places API to obtain the address corresponding to the clicked coordinates.
/**
 * Handle the click event on the map
 * @param {LeafletMouseEvent} e - The event
 */
function handleMapClick(e) {
  getAddress(e.latlng.lat, e.latlng.lng, (address) => {
    orders.push({
      index: (orders.length + 1).toString(),
      latitude: e.latlng.lat,
      longitude: e.latlng.lng,
      address: address,
      color: getColorFromIndex(orders.length),
      isDepot: orders.length === 0
    });
    updateMarkers();
    updateList();
  });
}

/**
 * Get the address of a location
 * @param {number} latitude - The latitude of the location
 * @param {number} longitude - The longitude of the location
 * @param {function} action - The function to call with the address
 */
function getAddress(latitude, longitude, action) {
  // Define the parameters needed for the REST query.
  fetch(`https://api.dev.myptv.com/geocoding/v1/locations/by-position/${latitude}/${longitude}`,
    {
      method: "GET",
      headers: {
        "Content-Type": "application/json",
        "apiKey": api_key
      }
    })
    .then(response => response.json()
      .then(result => {
        if (result.locations) {
          action(result.locations[0].formattedAddress);
        } else if (result.description) {
          alert("Error: " + result.description);
        } else {
          alert("Error: No address found");
        }
      }))
    .catch(ex => {
      alert(ex.message);
    });
}
When the user clicks on the map, we retrieve the coordinates of the click and use the PTV Developer Geocoding & Places API to obtain the corresponding address.
We then create a new order with this information and add it to the orders table.
Finally, we update the markers on the map and the list of orders in the side panel.
Displaying orders
To display the orders, we need two functions: one to update the markers on the map and one to update the list of orders in the side panel.
The updateMarkers function first deletes all existing markers, then creates a new marker for each order.
/**
 * Update the markers on the map
 */
function updateMarkers() {
  removeAllMarkers();
  orders.forEach((order) => {
    const svg = createMarkerSVG(order.color, '#ffffff', order.index);
    const divIcon = createDivIcon(svg);
    L.marker([order.latitude, order.longitude], { icon: divIcon }).addTo(map);
  });
}

/**
 * Remove all the markers from the map
 */
function removeAllMarkers() {
  map.eachLayer(function (layer) {
    if (layer instanceof L.Marker) {
      map.removeLayer(layer);
    }
  });
}
The updateList function first empties the order list, then adds each order to the list. The first order will always be the depot.
/**
 * Update the orders list
 */
function updateList() {
  $('#order-list').empty();

  for (const order of orders) {
      addOrderToList(order);
  }
}

/**
 * Add an order to the orders list
 * @param {object} order - The order to add
 */
function addOrderToList(order) {
  const ordersList = $('#order-list');
  const orderItem = $(`<div class="order-item container container-row space-between"></div>`);

  const markerIcon = `<div><span class="marker-icon" style="background-color: ${order.color};">${order.index}</span> ${order.address}</div>`;
  const depotLabel = '<div>Depot</div>';

  orderItem.append(markerIcon);
  if(order.isDepot) {
    orderItem.append(depotLabel);
  }

  ordersList.append(orderItem);
}
We also need to update our HTML to replace the text "Orders list here" with an element that will contain our list of orders:
<div class="grow-1 scrollable border" id="order-list"></div>Route optimization
Preparation of optimization request
In this step, we're going to implement route optimization. To do this, we first need to create functions that will transform our data into a format compatible with PTV Route Optimization OptiFlow API.
/**
 * Create a delivery
 * @param {object} order - The order
 * @returns {object}
 */
function createDelivery(order) {
  return {
    id: order.index,
    delivery: {
      locationId: order.index,
      duration: order_service_time,
      categories: [order.index]
    },
    properties: {
      categories: [order.index]
    }
  };
}
/**
 * Create a vehicle
 * @param {object} order - The order depot
 * @param {number} currentIndex - The index of the vehicle for the current depot
 * @returns {object} - The vehicle, with an id composed of the order depot index and the vehicle index for the current depot
 */
function createVehicle(order, currentIndex) {
  return {
    id: currentIndex.toString(),
    costs: {
      perHour: vehicle_cost_per_hour,
      perKilometer: vehicle_cost_per_kilometer,
      fixed: vehicle_fix_cost
    },
    start: {
      locationId: order.index,
      earliestStartTime: start_of_day.toISOString(),
    },
    end: {
      locationId: order.index,
      latestEndTime: end_of_day.toISOString()
    },
    routing: {
      profile: 'EUR_CAR'
    },
    categories: [currentIndex.toString()]
  };
}
/**
 * Create a depot
 * @param {object} order - The order depot
 * @returns {object}
 */
function createDepot(order) {
  return {
    id: order.index,
    locationId: order.index
  };
}
/**
 * Create a location
 * @param {object} order - The order
 * @returns {object}
 */
function createLocation(order) {
  return {
    id: order.index,
    latitude: order.latitude,
    longitude: order.longitude
  };
}
/**
 * Create the settings
 * @returns {object} - The settings
 */
function createSettings() {
  return {
    duration: optimization_duration
  };
}
/**
 * Create the request body
 * @returns {object} - The request body
 */
function createRequestBody() {
  const locations = [];
  const deliveries = [];
  const vehicles = [];
  const depots = [];
  const settings = createSettings();
  for (const order of orders) {
    // Create the location
    locations.push(createLocation(order));
    if (order.isDepot) {
      // Create the depot
      depots.push(createDepot(order));
      // Create the vehicles
      for (let currentIndex = 1; currentIndex <= getVehicleCount(); currentIndex++) {
        vehicles.push(createVehicle(order, currentIndex));
      }
    } else {
      // Create the delivery
      deliveries.push(createDelivery(order));
    }
  }
  const requestBody = {
    locations,
    orders: {
      deliveries
    },
    vehicles,
    depots,
    settings
  };
  return requestBody;
}
These functions create the various parts of the optimization query:
createDeliverycreates a delivery for an ordercreateVehiclecreates a vehicle for a depotcreateDepotcreates a depot for an order marked as a depotcreateLocationcreates a location for an ordercreateSettingscreates a settings with the optimization durationcreateRequestBodyassembles all these parts into a complete query body
Calling the optimization API
Now we'll implement the startOptimization function to send the request to the PTV Route Optimization OptiFlow API.
/**
 * Start the optimization
 */
function startOptimization() {
  if (orders.filter(o => o.isDepot).length === 0) {
    alert("Error: No depot found");
    return;
  }
  const requestBody = createRequestBody();
  fetch(
    `https://api.myptv.com/routeoptimization/optiflow/v1/optimizations`,
    {
      method: "POST",
      headers: {
        "Content-Type": "application/json",
        "apiKey": api_key
      },
      body: JSON.stringify(requestBody)
    }
  )
    .then(response => response.json()
      .then(result => {
        if (result.id) {
          fetchResult(result.id);
        } else {
          alert("Error: No optimization ID found");
        }
      }))
    .catch(ex => {
      console.error(ex);
      alert(ex.message);
    });
}
This function first checks that there is at least one repository, then creates the request body and sends it to the PTV Route Optimization OptiFlow API. If the request succeeds, it calls the fetchResult function with the optimization ID.
Optimization follow-up
Optimization is an asynchronous process, we need to periodically query the API to check the status of the optimization.
/**
 * Periodically fetch the result of the optimization
 * @param {string} optimizationId - The ID of the optimization
 */
function fetchResult(optimizationId) {
  fetch(`https://api.myptv.com/routeoptimization/optiflow/v1/optimizations/${optimizationId}`, {
    method: "GET",
    headers: {
      "Content-Type": "application/json",
      "apiKey": api_key
    }
  })
    .then(response => response.json()
      .then(result => {
        if (['FAILED', 'SUCCEEDED'].includes(result.status)) {
          onOptimized();
          showResult(result);
        } else {
          const isFullyScheduled = result.metrics?.numberOfUnscheduledOrders === 0;
          if(getOptimizationStop() && isFullyScheduled) {
            stopOptimization(optimizationId);
          }
          onOptimizing(result.status);
          setTimeout(() => fetchResult(optimizationId), 1000);
        }
      }))
    .catch(ex => {
      console.error(ex);
      alert(ex.message);
    });
}
During optimization, we disable all UI controls and display the current optimization status. We poll the API every second until the optimization is complete (success or failure). Once the optimization is complete, we reactivate the controls and display the result.
If the optimization is not completed but all orders are scheduled, depending on the setting, the optimization can be stopped.
/**
 * Stop the optimization
 * @param {string} optimizationId - The ID of the optimization
 */
function stopOptimization(optimizationId) {
  fetch(`https://api.myptv.com/routeoptimization/optiflow/v1/optimizations/${optimizationId}/stop`, {
    method: "POST",
    headers: {
      "Content-Type": "application/json",
      "apiKey": api_key
    }
  })
}
Displaying results
Once the optimization is complete, we need to display the results on the map and update the order information.
/**
 * Convert an order index to coordinates
 * @param {string} orderIndex - The index of the order
 * @returns {array} - The coordinates of the order
 */
function orderIndexToCoordinates(orderIndex) {
  const order = orders.find(o => o.index === orderIndex);
  return [order.latitude, order.longitude];
}
/**
 * Extract the polyline of a route
 * @param {object} route - The route
 * @returns {L.Polyline} - The polyline of the route
 */
function extractRoutePolyline(route) {
  const routeCoordinates = []
  routeCoordinates.push(orderIndexToCoordinates(route.start.locationId))
  for (const stop of route.stops) {
    for (const appointment of stop.appointments) {
      for (const task of appointment.tasks) {
        if(task.depotId === undefined) {
          routeCoordinates.push(orderIndexToCoordinates(task.orderId))
        }
      }
    }
  }
  routeCoordinates.push(orderIndexToCoordinates(route.end.locationId))
  const polyline = L.polyline(routeCoordinates, {
    color: routeDisplay.current.layer ? optimized_route_color : previous_route_color,
    weight: 6,
    opacity: 1
  })
  return polyline;
}
/**
 * Show the result of the optimization
 * @param {object} result - The result of the optimization
 */
function showResult(result) {
  if (result.routes) {
    const routesPolylines = []
    for (const route of result.routes) {
      routesPolylines.push(extractRoutePolyline(route));
      updateOrdersConstraints(route);
    }
    displayPolyline(routesPolylines);
    updateList();
  }
}
/**
 * Display the polyline of the optimization
 * @param {array} polylines - The polylines of the optimization
 */
function displayPolyline(polylines) {
  if (polylineLayer !== null) {
    map.removeLayer(polylineLayer);
  }
  polylineLayer = L.layerGroup(polylines).addTo(map);
}
These functions extract routes from the optimization results and display them on the map as polylines.
/**
 * Update the orders constraints
 * @param {object} route - The route
 */
function updateOrdersConstraints(route) {
  for (const stop of route.stops) {
    for (const appointment of stop.appointments) {
      for (const task of appointment.tasks) {
        if(task.depotId === undefined) {
          const order = orders.find(o => o.index === task.orderId);
          order.arrival = dayjs(stop.arrival);
          order.vehicleId = Number(route.vehicleId);
          order.depotId = Number(route.start.locationId);
          order.used = true;
        } else {
          const depot = orders.find(o => o.index === task.depotId);
          depot.used = true;
        }
      }
    }
  }
}
They also update order information with estimated arrival times and assigned vehicles.
Improved order display
We also need to update our addOrderToList function to display the new order information.
We use four columns per line to display all the necessary information:
| 1 | Rüppurrer Straße 50, 76137 Karlsruhe | Depot | 🔒 |
| 2 | Rüppurrer Straße 50, 76137 Karlsruhe Arrival: 12:00 Vehicle: 1 |
/**
 * Add an order to the orders list
 * @param {object} order - The order to add
 */
function addOrderToList(order) {
  const ordersList = $('#order-list');
  const orderItem = $(`<div class="order-item container container-row ${order.used ? 'used' : ''}"></div>`);

  const leftColumn = $('<div class="container container-column grow-0"></div>');
  const middleColumn = $('<div class="container container-column grow-1"></div>');
  const rightColumn = $('<div class="container container-column grow-0"></div>');
  const lockColumn = $('<div class="container container-column grow-0"></div>');
  const markerIcon = `<div><span class="marker-icon" style="background-color: ${order.color};">${order.index}</span></div>`;
  const addressInfo = `<div>${order.address}</div>`;
  const deliveryInfo = `
    <div>
      ${order.arrival !== undefined ? `<span> Arrival: ${order.arrival.format('HH:mm')}</span>` : ''}
      ${order.vehicleId !== undefined ? `<span> Vehicle: ${order.vehicleId}</span>` : ''}
    </div>
  `;
  const depotLabel = 'Depot';
  leftColumn.append(markerIcon);
  middleColumn.append(addressInfo);
  if (!order.isDepot) {
    middleColumn.append(deliveryInfo);
  } else {
    rightColumn.append(depotLabel);
  }

  orderItem.append(leftColumn, middleColumn, rightColumn, lockColumn);
  ordersList.append(orderItem);
}
This new version of addOrderToList displays not only the order address, but also the estimated time of arrival and the assigned vehicle.
Updating the updateList function
We also need to update our updateList function to to sort orders correctly.
/**
* Sort the orders by vehicleId, arrival time or original order
* @param {object} orderA - The first order
* @param {object} orderB - The second order
* @returns {number} - The sorted order
*/
function sortOrders(orderA, orderB) {
// The depots are always placed at the beginning
if (orderA.isDepot) return -1;
if (orderB.isDepot) return 1;
// Sort by vehicleId if available
if (orderA.vehicleId !== orderB.vehicleId) {
if (orderA.vehicleId === undefined) return 1;
if (orderB.vehicleId === undefined) return -1;
return orderA.vehicleId - orderB.vehicleId;
}
// Sort by arrival time if available
if (orderA.arrival && orderB.arrival) {
return orderA.arrival.diff(orderB.arrival);
}
// Keep the original order if no arrival time
return 0;
}
/**
* Update the orders list
*/
function updateList() {
$('#order-list').empty();
const ordersList = orders.sort(sortOrders);
for (const order of ordersList) {
addOrderToList(order);
}
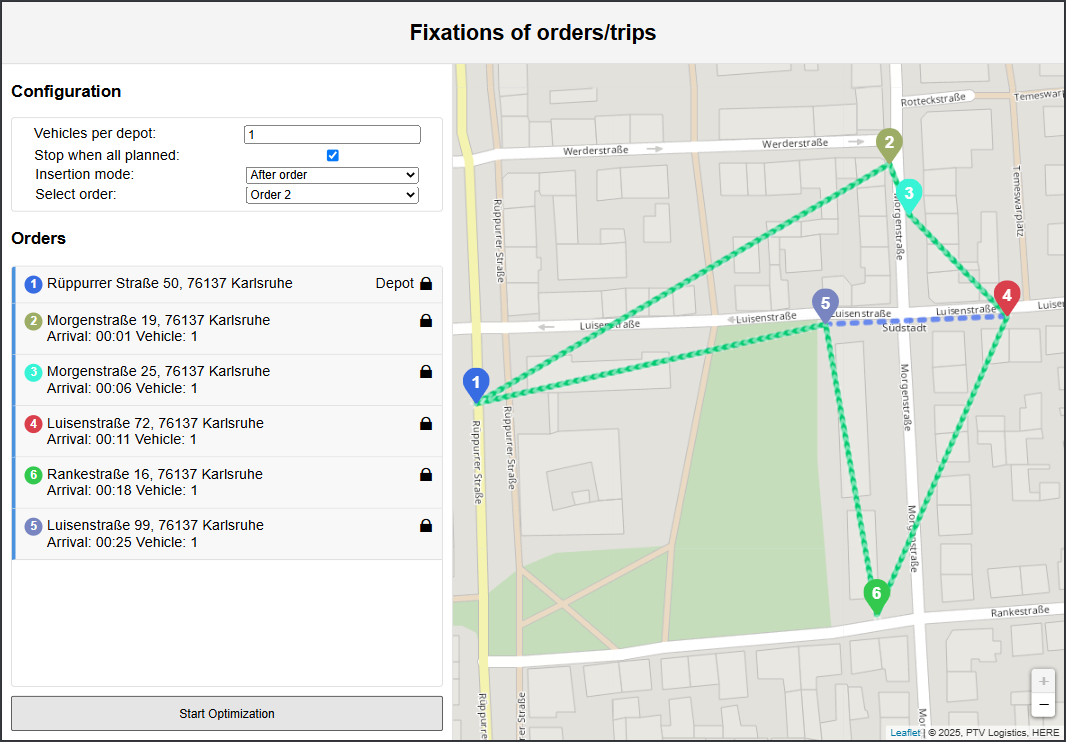
}This new version of updateList displays depots first, then commands by routes and scheduled time.
Sequence preservation and re-optimization
Storage of optimized routes
In this final step, we'll add functionality to preserve existing sequences and re-optimize routes when new orders are added. To do this, we first need to store the optimized routes.
/**
 * The optimized routes
 * @type {RouteStructure[]}
 */
let optimizedRoutes = [];
This global variable will enable us to store the optimized routes for reuse in subsequent optimizations.
Route conversion for re-optimization
We need functions to convert optimized routes into input routes that we can use for re-optimization.
/**
 * Maps optimized Route to input RouteStructure
 *
 * @param {Route} optimizedRoute - Optimized route from API result.
 * @returns {RouteStructure} Mapped RouteStructure ready for re-optimization.
 */
function mapOptimizedRouteToStructure(optimizedRoute) {
  let routeStructure = {
    vehicleId: optimizedRoute.vehicleId,
    start: optimizedRoute.start.departure,
    tasks: [],
    breaks: []
  };
  for (let stop of optimizedRoute.stops) {
    for (let appointment of stop.appointments) {
      for (let task of appointment.tasks) {
        routeStructure.tasks.push({
          orderId: task.orderId,
          type: task.type,
          depotId: task.depotId
        });
      }
      for (let pause of appointment.breaks) {
        routeStructure.breaks.push({
          start: pause.start,
          duration: pause.duration
        });
      }
    }
  }
  return routeStructure;
}
This function converts an optimized route into a structure that we can use for re-optimization. It extracts the vehicle ID, departure time, tasks and breaks.
- Note: Check your individual price plan or contract to see whether or not the request may contain routes.
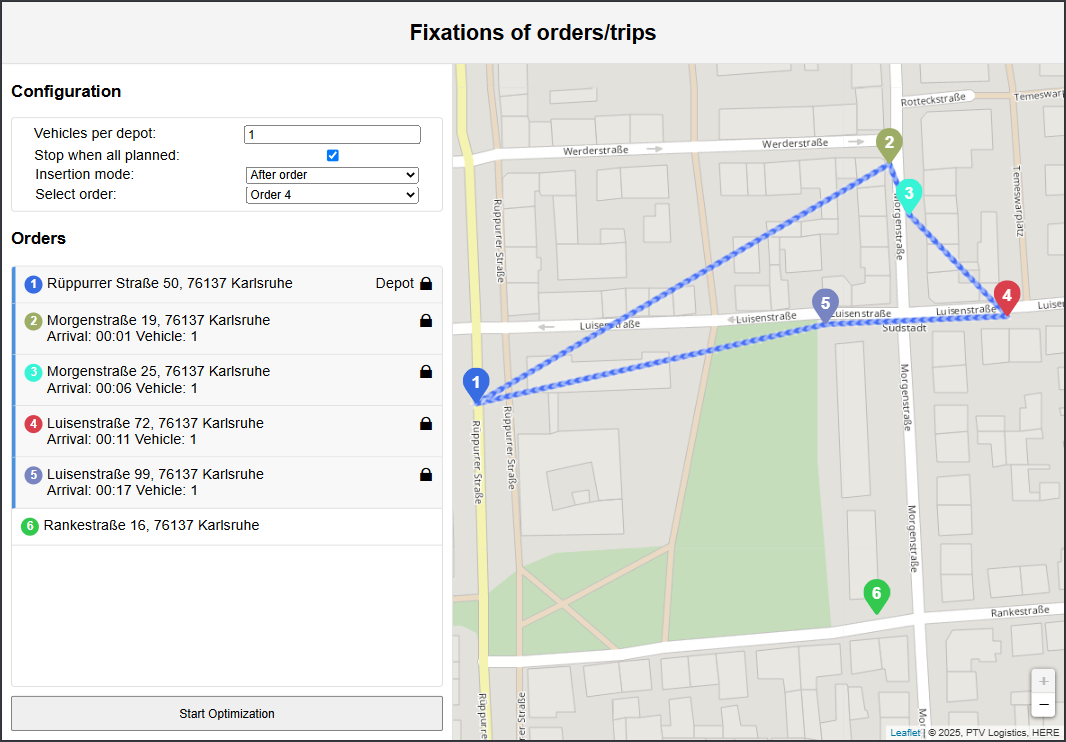
Insertion mode
We will then add two more parameters to the configuration part of the html file
<label>
  <span>Insertion mode:</span>
  <select id="insertion-mode">
    <option value="anywhere">Anywhere</option>
    <option value="before">Before order</option>
    <option value="direct-before">Directly before order</option>
    <option value="after">After order</option>
    <option value="direct-after">Directly after order</option>
  </select>
</label>
<label id="order-selector" style="display: none;">
  <span>Select order:</span>
  <select id="insertion-order">
  </select>
</label>
As well as retrieving the values from the javascript file
/**
 * Get the insertion mode
 * @returns {string} - The insertion mode
 */
function getInsertionMode() {
  return $('#insertion-mode').val();
}
/**
 * Get the insertion order
 * @returns {string} - The insertion order
 */
function getInsertionOrder() {
  return $('#insertion-order').val();
}
Now we can choose where you want to insert new orders.
Identifying new orders
When we create deliveries, we will assign a different task category if the order is already part of a route (associated with a vehicle) or if it is a new order to be inserted.
/**
 * Create a delivery
 * @param {object} order - The order
 * @returns {object}
 */
function createDelivery(order) {
  return {
    id: order.index,
    delivery: {
      locationId: order.index,
      duration: order_service_time,
      categories: [order.index, !order.vehicleId ? 'new' : 'optimized']
    },
    properties: {
      categories: [order.index],
    },
  };
}
Creation of sequence constraints
To preserve the order of orders in existing routes, we need to create sequence constraints.
/**
 * Create the respected sequence
 * @param {object} optimizedRoute - The optimized route
 * @returns {object} - The respected sequence
 */
function createRespectedSequence(optimizedRoute) {
  const respectedSequence = {
    taskCategories: [],
  };
  for (const stop of optimizedRoute.stops) {
    for (const appointment of stop.appointments) {
      for (const task of appointment.tasks) {
        if (task.depotId === undefined) {
          respectedSequence.taskCategories.push(task.orderId);
        }
      }
    }
  }
  // If we are inserting directly before or after an order, we need to add the new orders to the respected sequence
  const insertionMode = getInsertionMode();
  const insertionOrder = getInsertionOrder();
  if (insertionMode === 'direct-before') {
    const index = respectedSequence.taskCategories.indexOf(insertionOrder);
    if (index !== -1) {
      respectedSequence.taskCategories.splice(index, 0, 'new');
    }
  } else if (insertionMode === 'direct-after') {
    const index = respectedSequence.taskCategories.indexOf(insertionOrder);
    if (index !== -1) {
      respectedSequence.taskCategories.splice(index + 1, 0, 'new');
    }
  }
  return respectedSequence;
}
- Note: The
taskCategoriesproperty refers to the order'sdelivery.categoriesproperty.
This function creates a sequence constraint from an optimized route. It extracts order’s task IDs in the sequence in which they appear in the route.
If the insertion mode is directly-before or directly-after, then the category of new orders is added to the sequence at the desired point.
Forbidden sequences
When we want to insert orders before or after another order, we need to block insertion in the opposite direction.
In other words, if we want to insert after an order, the new orders cannot come before the selected order.
Similarly, if we want to insert before an order, the new orders cannot be after that order.
/**
 * Create a forbidden sequence if we are inserting before or after an order
 * @returns {object} - The forbidden sequence
 */
function createForbiddenSequences() {
  const insertionMode = getInsertionMode();
  const insertionOrder = getInsertionOrder();
  if (insertionMode === 'before') {
    return {
      firstTaskCategory: insertionOrder,
      type: 'NOT_BEFORE',
      secondTaskCategory: 'new',
    };
  }
  if (insertionMode === 'after') {
    return {
      firstTaskCategory: 'new',
      type: 'NOT_BEFORE',
      secondTaskCategory: insertionOrder,
    };
  }
  return undefined;
}
- If you choose to insert before an order, new orders cannot be inserted after the selected order.
- If you choose to insert after an order, new orders cannot be inserted before the selected order.
Order-vehicle assignment constraints
To preserve the assignment of orders to vehicles, we need to create order-vehicle assignment constraints.
/**
 * Create an order vehicle combination
 * @param {object} order - The order
 * @returns {object}
 */
function createOrderVehicleCombination(order) {
  return {
    type: 'ORDER_REQUIRES_VEHICLE',
    orderCategory: order.index,
    vehicleCategory: order.vehicleId.toString()
  };
}
- Note: The
orderCategoryproperty refers to the order'sproperties.categoriesproperty.
This function creates an order-vehicle assignment constraint from an order. It specifies that the order must be delivered by a specific vehicle.
Enhanced optimization request
Now we need to update our createRequestBody function to include the sequence and order-vehicle assignment constraints.
/**
* Create the request body
* @returns {object} - The request body
*/
function createRequestBody() {
const locations = [];
const deliveries = [];
const vehicles = [];
const depots = [];
const settings = createSettings();
const orderVehicle = [];
const respectedSequences = [];
const forbiddenSequences = [];
const routes = [];
for (const order of orders) {
// Create the location
locations.push(createLocation(order));
if (order.isDepot) {
// Create the depot
depots.push(createDepot(order));
// Create the vehicles
for (let currentIndex = 1; currentIndex <= getVehicleCount(); currentIndex++) {
vehicles.push(createVehicle(order, currentIndex));
}
} else {
// Create the delivery
deliveries.push(createDelivery(order));
}
if (order.vehicleId !== undefined && order.depotId !== undefined) {
// Create the order vehicle combination
orderVehicle.push(createOrderVehicleCombination(order))
}
}
if (optimizedRoutes.length > 0) {
for (const route of optimizedRoutes) {
routes.push(mapOptimizedRouteToStructure(route));
respectedSequences.push(createRespectedSequence(route));
}
const forbiddenSequence = createForbiddenSequences();
if (forbiddenSequence !== undefined) {
forbiddenSequences.push(forbiddenSequence);
}
}
const requestBody = {
locations,
orders: {
deliveries,
},
vehicles,
depots,
settings,
constraints: {
combinations: {
orderVehicle,
},
tasks: {
respectedSequences,
forbiddenSequences,
},
},
routes,
};
return requestBody;
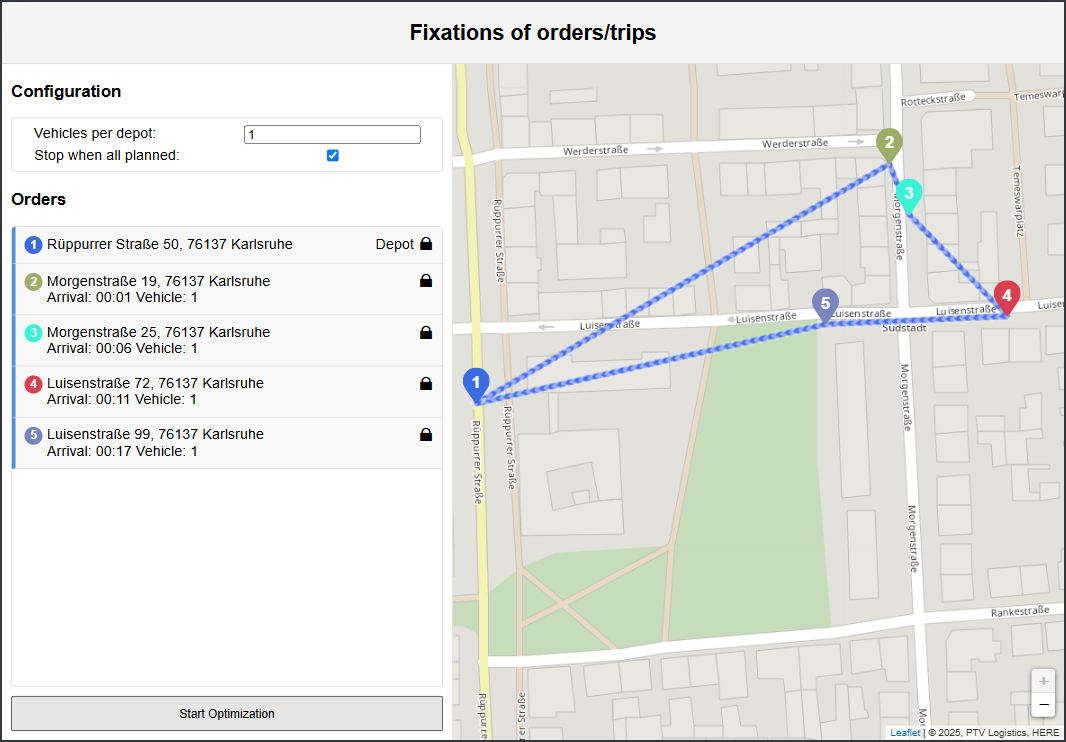
}This new version of createRequestBody includes respected and forbidden sequences and order-vehicle assignment constraints, as well as previously optimized routes.
Updating the showResult function
Finally, we need to update our showResult function to store the optimized routes.
/**
 * Show the result of the optimization
 * @param {object} result - The result of the optimization
 */
function showResult(result) {
  if (result.routes) {
    optimizedRoutes = result.routes;
    let routesPolylines = []
    for (let route of optimizedRoutes) {
      routesPolylines.push(extractRoutePolyline(route));
      updateOrdersConstraints(route);
    }
    displayPolyline(routesPolylines);
    updateList();
  }
}
This new version of showResult stores optimized routes in the optimizedRoutes variable for reuse in subsequent optimizations.
Lock used orders and depots
To prevent the modification of an order or a depots constrained by a route, we're going to add a property to the orders used.
/**
 * Update the orders constraints
 * @param {object} route - The route
 */
function updateOrdersConstraints(route) {
  for (let stop of route.stops) {
    for (let appointment of stop.appointments) {
      for (let task of appointment.tasks) {
        if(task.depotId === undefined) {
          let order = orders.find(o => o.index === task.orderId);
          order.arrival = dayjs(stop.arrival);
          order.vehicleId = Number(route.vehicleId);
          order.depotId = Number(route.start.locationId);
          order.used = true;
        } else {
          let depot = orders.find(o => o.index === task.depotId);
          depot.used = true;
        }
      }
    }
  }
}
A new optimisation can now be run, respecting the insertion constraints and retaining the previously optimised routes.
- Note: There are many ways to constrain or regulate the creation of routes with the Route Optimization OptiFlow API, such as with TimeWindows, which will force the respect of these ranges to prevent a vehicle from arriving too early or too late.