The goal of this tutorial is to build a simple routing React app from scratch using the PTV Vector Map and the PTV Developer clients for TypeScript.
In this tutorial, for the sake of simplicity, our app will not include any CSS file, nor context manager. This tutorial will also use a minimal number of libraries. Please note that this tutorial is only for learning purpose, and does not follow the guidelines of a real productive app.
Prerequisites
- Basic JavaScript knowledge.
- Basic knowledge of JavaScript asynchronous programming using Promises.
- Basic React knowledge.
- Node 18+ installed.
- Visual Studio Code with eslint/prettier add-ons.
How to use this tutorial
The goal of this tutorial is to demonstrate how to use PTV TypeScript clients to build an easy Routing App with a Vector Map supporting Drag&Drop in a React environment. This tutorial is built step by step. Each chapter uses the code written in the previous chapters.
Getting started
The app will be created from the vitejs.dev template. vite creates a simple one page application in React.
npm create vite@latest
√ Project name: ... Basic-Routing-React
√ Package name: ... basic-routing-react
√ Select a framework: » React
√ Select a variant: » TypeScript
Scaffolding project in D\Basic-Routing-React...
Done. Now run:
  cd Basic-Routing-React
  npm install
  npm run dev
Inside Basic-Routing-React, run npm run dev to start a local development environment (http://localhost:5173/).
Choose your UI library
To make our application pretty, it is possible to choose a UI framework that will do all the styling work. There are plenty of different UI libraries, here are a few of them:
- Material UI ( https://mui.com/material-ui/getting-started/overview/ )
- React Bootstrap ( https://react-bootstrap.netlify.app/docs/getting-started/introduction )
- Ant Design ( https://ant.design/components/overview/ )
In this tutorial we will use Material UI.
npm install @mui/material @emotion/react @emotion/styledAPI token management
A PTV Developer API keys is needed to make this app: https://myptv.com/developer/subscription/productinstanceid/api-keys
Then, create a .env at the root of the project. The needed api keys will be stored in this environment file.
VITE_API_KEY= <your PTV Developer API key>Add the PTV Developer Vector Maps API
Mapbox will be used to display the PTV Developer Vector Maps API. Install the latest mapbox version that does not require an API key to work.
npm install --save react-map-gl mapbox-gl@1.13.0Then, create a simple map component, called src/MapboxMap.tsx
import Map from "react-map-gl"
import "mapbox-gl/dist/mapbox-gl.css";
export function MapboxMap() {
  return (
    <Map
      style={{ height: "100%", width: "100%"}}
      mapStyle="https://vectormaps-resources.myptv.com/styles/latest/standard.json"
      transformRequest={(url) => ({
        url: url + "?apiKey=" + import.meta.env.VITE_API_KEY
      })}
    />
  )
}
Now, our MapboxMap component can be added in the src/App.tsx
import { Box } from '@mui/material'
import { MapboxMap } from './MapboxMap'
export default function App() {
	return <Box sx={{
	  position: "absolute",
	  gridArea: "map",
	  height: "100%",
	  width: "100%",
	  zIndex: 0
	}}>
	  <MapboxMap/>
	</Box>
}
At this point, the PTV Developer World map should be displayed on http://localhost:5173/.
Add PTV Developer API client for TypeScript
The PTV Developer API client for TypeScript contains types, models and utility functions, allowing you to easily work with the PTV Developer API in a strongly typed environment.
There are two ways to add the TypeScript PTV Developer API client in the application. Either via building it with @openapitools or downloading it via Github.
Method 1: Clone the Github repository of the PTV Developer API
Add a npm generate generate-typescript-routing in your package.json
"scripts":{
    "generate-typescript-routing": "rimraf -rf src/clients-routing-api && git clone https://github.com/PTV-Group/clients-routing-api src/clients-routing-api"
}
Method 2: Build an OpenAPI TypeScript client by using @openapitools
npm install -g --save @openapitools/openapi-generator-cliDownload the specification of the PTV Developer API here: https://api.myptv.com/meta/services/routing/v1/openapi.json
Add a npm generate-typescript-routingscript in your package.json
"scripts":{
    "generate-typescript-routing": "openapi-generator-cli generate --generator-name typescript-fetch --additional-properties=typescriptThreePlus=true --global-property apis,apiTests=false,models,modelTests=false,supportingFiles"
}
and execute it with the openapi.json as input and a typescript-client folder as output
npm run generate-typescript -- --input-spec ./openapi.json --output ./src/clients-routing-api
All the network logic (headers, cors, url endpoint) is directly handled by the generated RoutingAPI object.
import { Configuration, RoutingApi } from './typescript-client'
const routingApi = new RoutingApi(new Configuration({ apiKey: import.meta.env.VITE_API_KEY }))

const response = await routingApi.current.calculateRoute({
   waypoints: ["49.0133618,8.4277972", "48.8950289,8.6715602"]
 })
Display waypoints and polyline on the map
Here are the actions that are often implemented in every routing app:
- When there's a click on the map, a waypoint is added at the clicked location
- When a waypoint is added, the route calculation is automatically triggered
- The new route is displayed on the map
So, modify our MapboxMap to add a few elements:
- The clicked locations will be stored in
waypoints.waypointsas an array of latitude/longitude. - The entire route response will be stored in
routeResponse. The OpenAPI TypeScript client has generated aRouteResponsetype for us that suits perfectly our needs.
In the onMapClick function, 3 different behaviours should be defined:
- Add a waypoint at the clicked locations
- If there are more than 2 waypoints, trigger a route calculation
- Wait and save the server response. As keyword
awaitis used, the function should beasync
async function onMapClick(e: MapLayerMouseEvent){
 const wp = waypoints.slice()
 wp.push({latitude: e.lngLat.lat, longitude: e.lngLat.lng})
 setWaypoints(wp)
 if(wp.length >= 2){
   const response = await routingApi.current.calculateRoute({waypoints: wp.map(w=>`${w.latitude},${w.longitude}`), results: ["POLYLINE"]}, options: {polylineMapType: PolylineMapType.VECTOR})
   setRouteResponse(response)
 }
}
Since we want to display the polyline on our vector map, we tell the routing API to return the polyline that fits the vector map. To do this, we set the PolylineMapType option parameter to PolylineMapType.Vector. In the Map component, add the the display of both waypoints and polyline. Please note that to display the polyline, a conversion from string polyline into a GeoJSON object is needed.
<Map>
 {waypoints.map((w,i)=><Marker key={i} latitude={w.latitude} longitude={w.longitude}/>)}
 {routeResponse?.polyline ? (<Source id="polyline" type="geojson" data={JSON.parse(routeResponse.polyline)}><Layer type='line'/></Source>) : null}
</Map>
With all of those modifications, MapboxMap should look like this:
import Map, { Layer, MapLayerMouseEvent, Marker, Source } from 'react-map-gl';
import { Configuration, RouteResponse, RoutingApi } from './typescript-client';
import { useRef, useState } from 'react';
import "mapbox-gl/dist/mapbox-gl.css";
export function MapboxMap() {
   const routingApi = useRef(new RoutingApi(new Configuration({ apiKey: import.meta.env.VITE_API_KEY })))
   const [waypoints, setWaypoints] = useState<{latitude: number, longitude: number}[]>([])
   const [routeResponse, setRouteResponse] = useState<RouteResponse>()
   async function onMapClick(e: MapLayerMouseEvent){
     const wp = waypoints.slice()
     wp.push({latitude: e.lngLat.lat, longitude: e.lngLat.lng})
     setWaypoints(wp)
     if(wp.length >= 2){
       const response = await routingApi.current.calculateRoute({waypoints: wp.map(w=>`${w.latitude},${w.longitude}`), results: ["POLYLINE"]})
       setRouteResponse(response)
     }
   }
 return <Map
     style={{width: "100%", height: "100%"}}
     mapStyle="https://vectormaps-resources.myptv.com/styles/latest/standard.json"
     transformRequest={(url) => ({url: url + "?apiKey=" + import.meta.env.VITE_API_KEY})}
     onClick={onMapClick}
   >
           {props.waypoints.map((w,i)=><Marker key={i} latitude={w.latitude} longitude={w.longitude} draggable={true} onDragEnd={e => onDragEnd(e, i)} color= "#ff414b"/>)}
      {props.routeResponse?.polyline && props.waypoints.length >= 2 ? (<Source id="polyline" type="geojson" data={JSON.parse(props.routeResponse.polyline)}><Layer type='line' paint={{'line-color':'#3353c8', 'line-width': 4}}/></Source>) : null}
   </Map>
}
At this point, it is possible to display the route polyline and markers on an interactive PTV Vector map
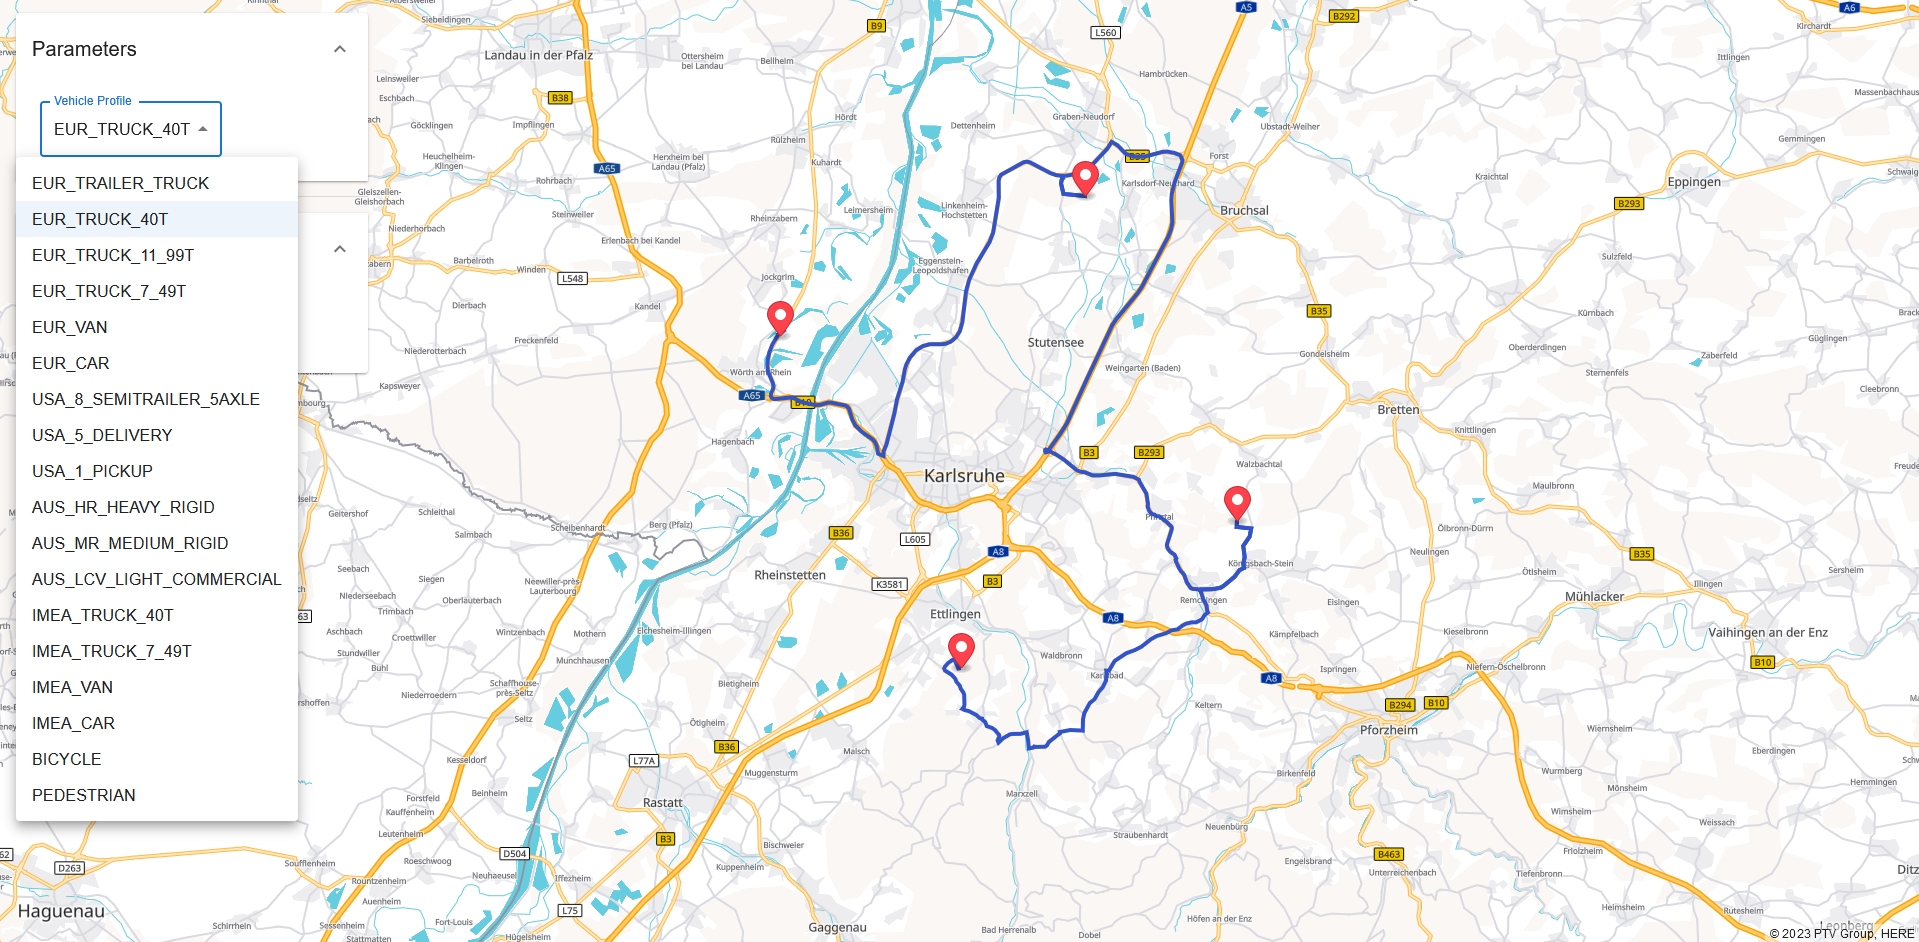
Vehicle Definition
For the moment, the vehicle type hasn't been specified yet. So add the vehicle profile in the request.
To get the list of available vehicles, generate a PTV Developer Data API client using either the https://github.com/PTV-Group/clients-data-api or the https://api.myptv.com/meta/services/data/v1/openapi.json with @openapitools.
"generate-typescript-data": "rimraf -rf src/clients-data-api && git clone https://github.com/PTV-Group/clients-data-api src/clients-data-api"Then, a call to this API to retrieve all the predefined profiles should be triggered when the user arrives on the page.
index.tsx
const dataAPI = new VehicleProfilesApi(new Configuration({ apiKey: import.meta.env.VITE_API_KEY}))

const defaultTheme = createTheme()

async function  main(){
  const vehicleProfiles = await dataAPI.getPredefinedVehicleProfiles()

  const root = ReactDOM.createRoot(
    document.getElementById('root') as HTMLElement
  );
  root.render(
    <React.StrictMode>
      <ThemeProvider theme={defaultTheme}>
        <CssBaseline />
        <App vehicleProfiles={vehicleProfiles}/>
      </ThemeProvider>
    </React.StrictMode>
  );
}

main()
This array of vehicle profiles can be used in the RequestParameter component to generate our list of available profiles.
import { Dispatch,SetStateAction } from "react";
import { PredefinedVehicleProfiles } from "./clients-data-api/typescript";
import { Box, FormControl, Grid, InputLabel, MenuItem, Select } from "@mui/material";

export function RequestParameter(props:{vehicleProfiles: PredefinedVehicleProfiles, vehicleProfile: string, setVehicleProfile: Dispatch<SetStateAction<string>>}){

    return <Box sx={{m:1}}>
        <Grid container spacing={2}>
            <Grid item>
                <FormControl>
                    <InputLabel id="vehicle-profile-label">Vehicle Profile</InputLabel>
                    <Select id="vehicle-profile" labelId="vehicle-profile-label" label="Vehicle Profile" value={props.vehicleProfile} onChange={(e)=>props.setVehicleProfile(e.target.value)}>
                        {props.vehicleProfiles.profiles.map(p=><MenuItem key={p.name} value={p.name}>{p.name}</MenuItem>)}
                    </Select>
                </FormControl>
            </Grid>
        </Grid>
    </Box>
}
Add the vehicle profile in the API call.
async function onMapClick(e: MapLayerMouseEvent) {
 const wp = waypoints.slice()
 wp.push({ latitude: e.lngLat.lat, longitude: e.lngLat.lng })
 setWaypoints(wp)
 if (wp.length >= 2) {
   const response = await routingApi.current.calculateRoute({
     waypoints: wp.map((w) => `${w.latitude},${w.longitude}`),
     results: [Results.POLYLINE, props.emissionMethod],
     profile: props.vehicleProfile
   })
   props.setRouteResponse(response)
 }
}
Now, the vehicle profile is taken into account in the app.
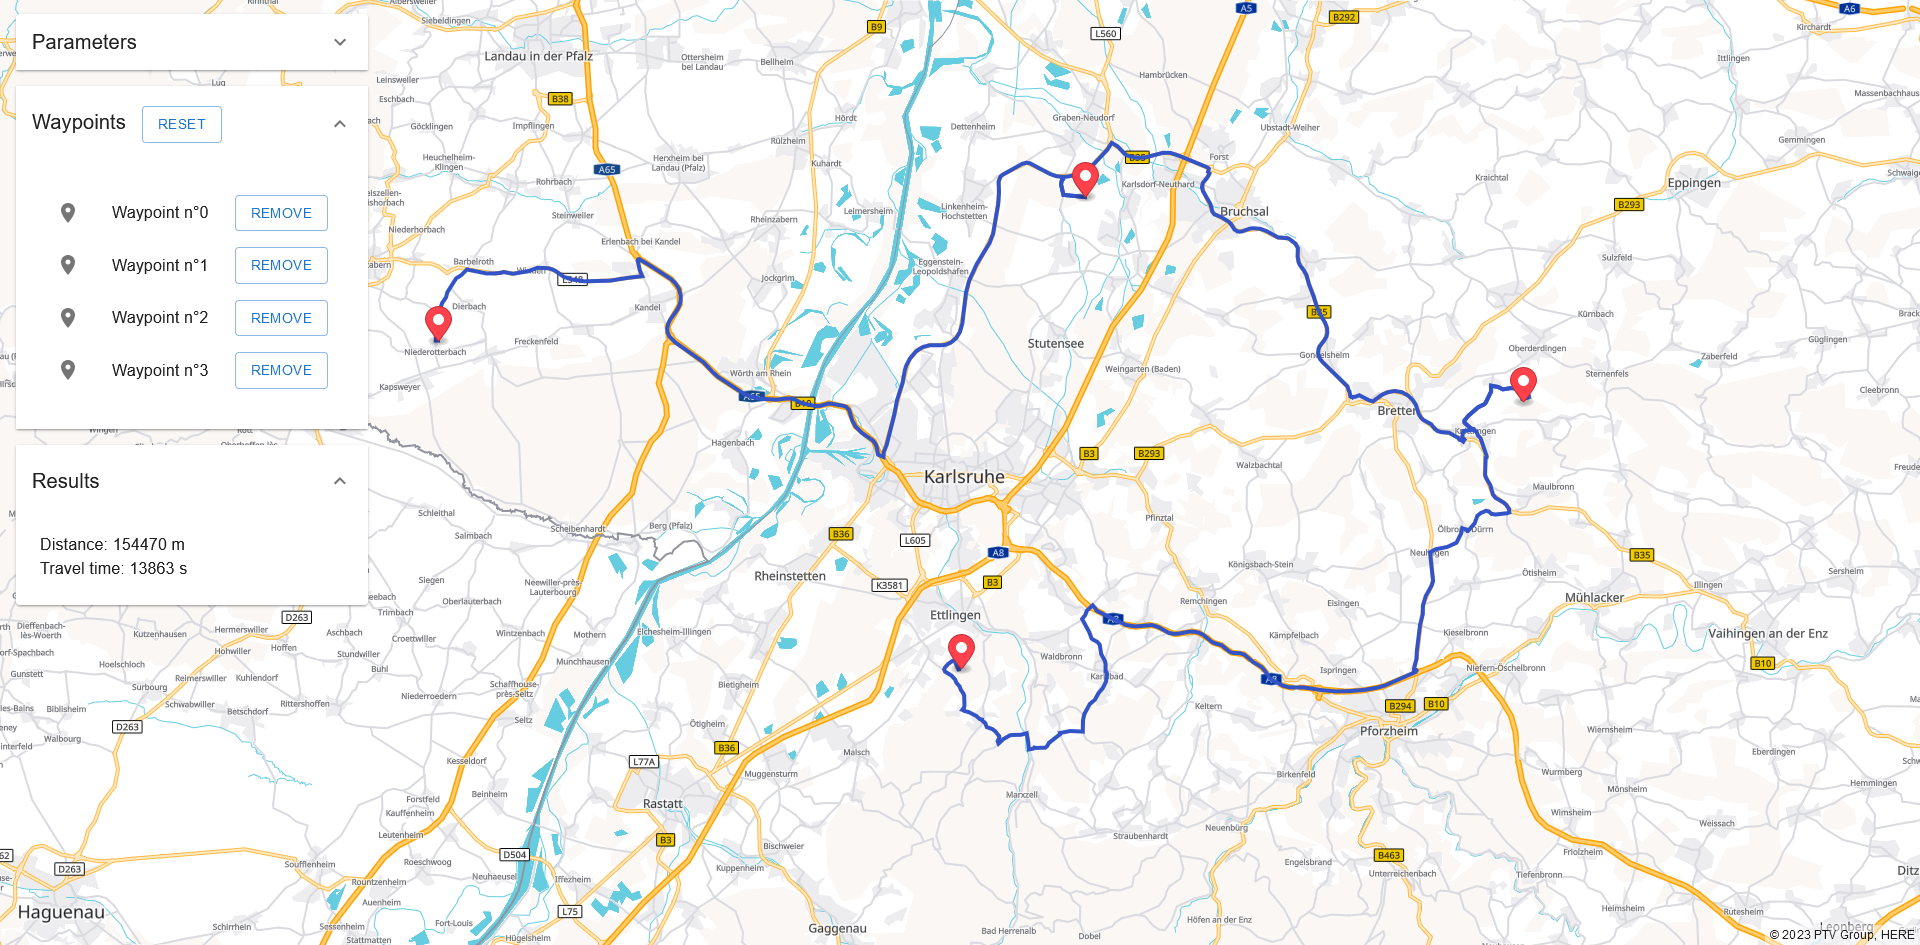
Waypoint management
The 2 behaviours to implement are:
- Remove a waypoint
- Drag and drop waypoints
To do so, create an interface IWaypoint that will be used to type our waypoints.
export interface IWaypoint {
 latitude: number
 longitude: number
 id: string
}
export default function App(props:{vehicleProfiles: PredefinedVehicleProfiles}) {
...
const [waypoints, setWaypoints] = useState<IWaypoint[]>([])
}
To generate ids, the simple lib nanoid is used.
npm install --save nanoidMapboxMap.tsx
async function onMapClick(e: MapLayerMouseEvent){
 const wp = props.waypoints.slice()
 wp.push({latitude: e.lngLat.lat, longitude: e.lngLat.lng, id: nanoid()})
 props.setWaypoints(wp)
 calculateRoute(wp)
}
Use also the small lib immer that will allow to work with immutable state in a more convenient way.
npm install --save immerUse it directly to manage the drag and drop of a waypoint.
MapboxMap.tsx
function onDragEnd(e: MarkerDragEvent, i: number){
 const wp = produce(props.waypoints, (draft) => {
   draft[i].latitude = e.lngLat.lat
   draft[i].longitude = e.lngLat.lng
 })
 props.setWaypoints(wp)
 calculateRoute(wp)
}
return <Map
   style={{width: "100%", height: "100%"}}
   mapStyle="https://vectormaps-resources.myptv.com/styles/latest/standard.json"
   transformRequest={(url) => ({url: url + "?apiKey=" + import.meta.env.VITE_API_KEY})}
   onClick={onMapClick}
 >
   {props.waypoints.map((w,i)=><Marker key={i} latitude={w.latitude} longitude={w.longitude} draggable={true} onDragEnd={e => onDragEnd(e, i)}/>)}
   {props.routeResponse?.polyline ? (<Source id="polyline" type="geojson" data={JSON.parse(props.routeResponse.polyline)}><Layer type='line'/></Source>) : null}
 </Map>
The removal of waypoints will be handled in a separate component.
Create a WaypointManager.tsx that contains a basic list of WaypointSettings components. (WaypointSettings component will be created just below)
In deleteClick, use mutable syntax. And immer will transform it to immutable instructions.
WaypointManager.tsx
import { Dispatch, SetStateAction } from "react";
import { IWaypoint } from "./App";
import { produce } from "immer";
import { PredefinedVehicleProfile } from "./clients-data-api/typescript";
import { Box, Button, List, ListItem, ListItemIcon, ListItemText } from "@mui/material";
import LocationOnIcon from '@mui/icons-material/LocationOn';

export function WaypointManager(props:{profile: PredefinedVehicleProfile, waypoints: IWaypoint[], setWaypoints: Dispatch<SetStateAction<IWaypoint[]>>}){

    function deleteClick(id: string){props.setWaypoints(produce(props.waypoints, draft => draft.filter(w=>w.id !== id)))}

    if(props.waypoints.length === 0){
        return null
    }

    return <Box sx={{m:1}}>
        <List>{props.waypoints.map((w,i)=><WaypointSettings key={w.id} profile={props.profile} waypoint={w} index={i} deleteClick={deleteClick} />)}</List>
    </Box>
}
Now, create a WaypointSettings component that will render a basic waypoint information display.
WaypointManager.tsx
export function WaypointSettings(props:{profile: PredefinedVehicleProfile, waypoint: IWaypoint, index: number, deleteClick:(id: string)=>void}){
    return <ListItem>
        <ListItemIcon>
            <LocationOnIcon />
        </ListItemIcon>
        <ListItemText primary={`Waypoint n°${props.index}`} />
        <Button variant="outlined" onClick={(e)=>props.deleteClick(props.waypoint.id)}>Remove</Button>
    </ListItem>
}
Then, add our WaypointManager in the main App
import { useEffect, useRef, useState } from 'react';
import { MapboxMap } from './MapboxMap';
import { BASE_PATH, Configuration, Results, RouteResponse, RoutingApi } from './clients-routing-api/typescript';
import { RequestParameter } from './RequestParameter';
import { Response } from './Response';
import { WaypointManager } from './WaypointManager';
import { Accordion, AccordionDetails, AccordionSummary, Box, Button, Typography } from '@mui/material';
import { adaptDeployment } from '@ptvgroup/deployment-detector';
import ExpandMoreIcon from '@mui/icons-material/ExpandMore';
import { nanoid } from 'nanoid';
import { PredefinedVehicleProfiles } from './clients-data-api/typescript';

export interface IWaypoint {
  latitude: number
  longitude: number
  id: string
}

export default function App(props:{vehicleProfiles: PredefinedVehicleProfiles}) {
  const routingApi = useRef(new RoutingApi(new Configuration({ apiKey: import.meta.env.VITE_API_KEY})))
  const [vehicleProfile, setVehicleProfile] = useState<string>("EUR_TRUCK_40T")
  const [routeResponse, setRouteResponse] = useState<RouteResponse>()
  const [waypoints, setWaypoints] = useState<IWaypoint[]>([
    { latitude: 49.067997655698235, longitude: 8.281971508594154, id: nanoid()},
    { latitude: 49.13093879586563, longitude: 8.491398388477364, id: nanoid()},
    { latitude: 48.98470298479353, longitude: 8.595768505663784, id: nanoid()},
    { latitude: 48.91841806102727, longitude: 8.406254345507477, id: nanoid()}
  ])

  const reset = ()=>{
    setWaypoints([])
    setRouteResponse(undefined)
  }

  const profile = props.vehicleProfiles.profiles.find(p=>p.name === vehicleProfile)!

  useEffect(()=>{
    calculateRoute()
  }, [waypoints, vehicleProfile])

  return <Box sx={{display:'flex'}}>
    <Box sx={{width:"20%", p: 2, zIndex: 1}}>
      <Accordion>
        <AccordionSummary expandIcon={<ExpandMoreIcon />}>
          <Typography variant="h6">Parameters</Typography>
        </AccordionSummary>
        <AccordionDetails>
          <RequestParameter vehicleProfiles={props.vehicleProfiles}  vehicleProfile={vehicleProfile} setVehicleProfile={setVehicleProfile}/>
        </AccordionDetails>
        </Accordion>
        <Accordion defaultExpanded={true}>
        <AccordionSummary expandIcon={<ExpandMoreIcon />}>
          <Typography variant="h6">Waypoints</Typography>
          <Button sx={{ml: 2}} variant="outlined" onClick={reset}>Reset</Button>
        </AccordionSummary>
        <AccordionDetails>
          <WaypointManager waypoints={waypoints} setWaypoints={setWaypoints} profile={profile}/>
        </AccordionDetails>
        </Accordion>
        <Accordion defaultExpanded={true}>
        <AccordionSummary expandIcon={<ExpandMoreIcon />}>
          <Typography variant="h6">Results</Typography>
        </AccordionSummary>
        <AccordionDetails>
          <Response routeResponse={routeResponse} waypoints={waypoints} />
        </AccordionDetails>
      </Accordion>
    </Box>
    <Box sx={{
      position: "absolute",
      gridArea: "map",
      height: "100%",
      width: "100%",
      zIndex: 0
    }}>
      <MapboxMap waypoints={waypoints} setWaypoints={setWaypoints} routeResponse={routeResponse} setRouteResponse={setRouteResponse} vehicleProfile={vehicleProfile} apiKey={props.apiKey}/>
    </Box>
  </Box>


  async function calculateRoute(){
    if(waypoints.length >= 2){
      const waypointsRequest = waypoints.map(w=>({offRoad: {latitude: w.latitude, longitude: w.longitude }}))
      const response = await routingApi.current.calculateRoutePost({
        routeRequest:{
          waypoints: waypointsRequest,
        },
        results: [Results.POLYLINE],
        profile: vehicleProfile,
        options: {
          polylineMapType: PolylineMapType.VECTOR
        }
      })
      setRouteResponse(response)
    }
  }
}
At this point on http://localhost:5173/, the waypoint manager is displayed on the left.